You can run this Mouse Automation Tool as signed on user or as Administrator. Lots of Games and other Applications like Android Emulator run with Admin Privileges, in order to send automated Mouse Clicks with Auto Clicker to applications running as Admin, you must run the Auto Clicker as Administrator. You can either read more about the software or just download the Auto Clicker and give it a try on your Windows Laptop or Desktop Computer.
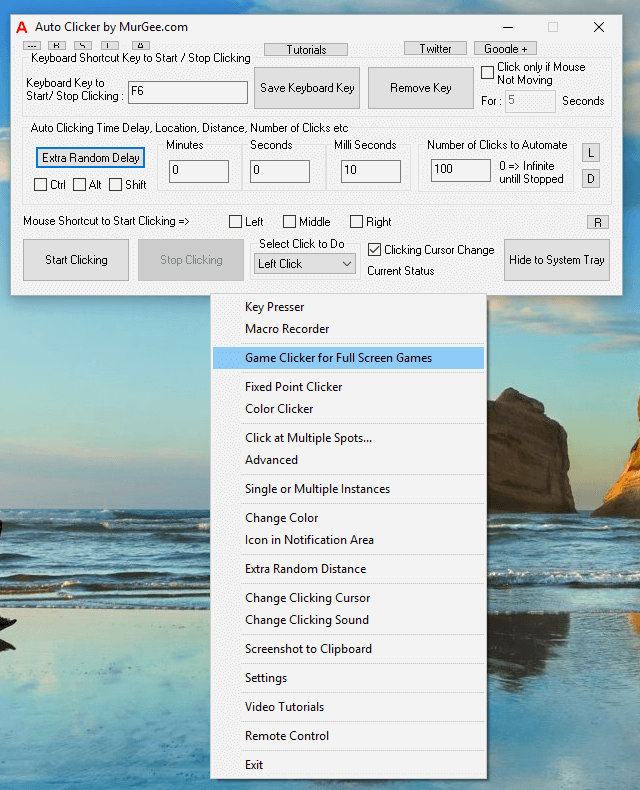
When Playing Multiplayer Games with Auto Clicker, you might need the Game Clicker for Full Screen Games. This Game Clicker simulates Mouse Clicks at deepest level and requires additional components to be installed. Yes there are tutorials available for all the features and are easy to follow and understand. The Game Clicker as displayed in the screenshot below allows you to use Right Mouse Click as Shortcut to Start the Automated Mouse Clicking. Yes you can Right Click again to stop Automated Mouse Clicking.
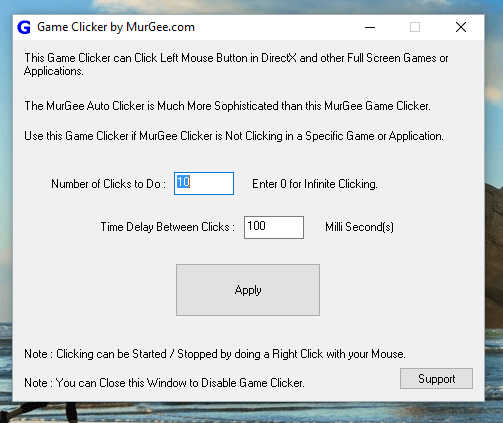
Yes you can use this Game Clicker in Online Games as well, however the configuration options are minimal as compared to the main application. In the configuration screen, you can configure the number of Left Mouse Clicks to be done whenever Right Mouse Click is done with physical Mouse. The Speed of Mouse Clicking is configurable by configuring Time Delay between Clicks allowing you to Click Faster or Slower as per your requirements.
Automated Mouse Click Explained
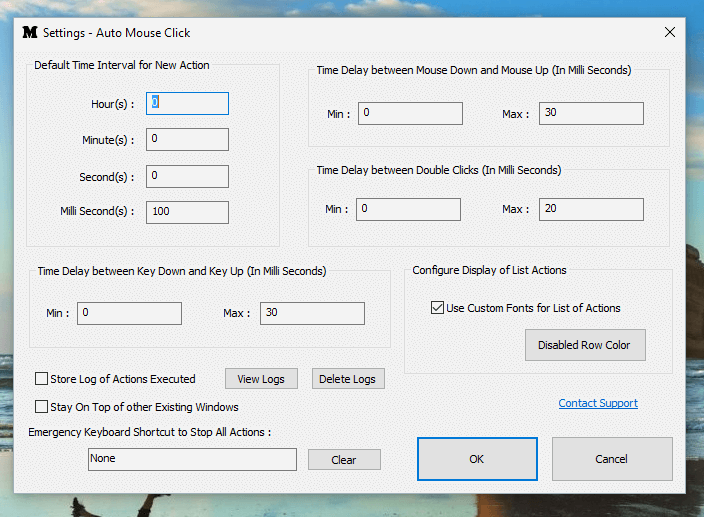
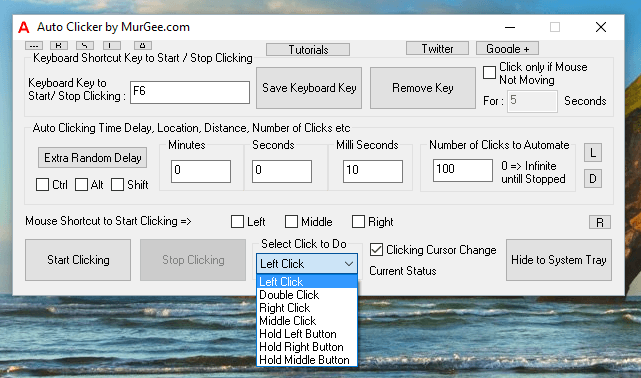
The Automated Mouse Clicks done by this Software are fully configurable. Apart from Number of Mouse Clicks to be done, Speed of Automated Mouse Clicking, you can even configure the time between Mouse Down and Mouse Up. Whenever a Mouse Click is done by hand, the Mouse button is pressed and then released. The Mouse Click is sent by Windows Operating System to the Application Window which is under the Current Mouse Cursor Location.

As displayed in the Screenshot above, you can configure the Time delay between Mouse Down and Mouse Up. Note that the time delay is configurable in terms of milli seconds and there are 2 fields named Minimum Time Delay and Maximum Time Delay. The Actual Time Delay simulated between Mouse Down and Mouse Up is taken as a Random Time Delay between Minimum and Maximum Time Delay so as to emulate Human Click behavior. Whenever you Click by hand, the effective time delay between Mouse Down and Mouse Up will be a random time delay and this Software Application allows you to emulate Mouse Clicking with hand.
Yes there is lots more in this nifty utility making it a powerful Mouse Clicker. There are still lots of features which you can use during GamePlay or to just Automate Mouse Clicking for repetitive tasks. Remember that you can download this Application right now on your Windows PC and start using it. In case you would like to read more, just keep on reading and explore other features of this software. The Screenshots of this software have been captured on a Windows 10 Computer and on other Windows Operating Systems, the Application adapts to your current Windows Theme. Whether you are using 32 bit Windows Operating System or a 64 bit Operating System, this Auto Clicker works well and is used by lots of Gamers around the world to Automate Mouse Clicking.
Screen Location of Automated Mouse Clicking
One of the unique features of this Mouse Automation Utility is that you can define the location on screen which receives the Automated Mouse Clicking. You can either configure the Software to send Mouse Clicks to a Fixed Screen Location or Click at Current Mouse Cursor Location. The Screen Location button allows you to configure the Screen Location which receives Automated Clicks as displayed in the screenshot below.
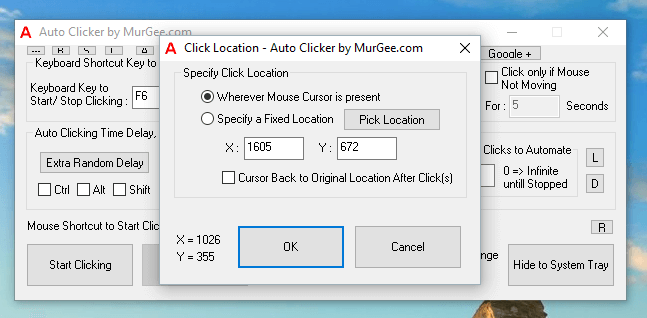
Note that in order to Click at a Fixed or Specific Screen Location you can use the Pick Location button or manually enter Screen Co-Ordinates. The Current Mouse Cursor location is displayed at the bottom of the Click Location Window as displayed in the screenshot above. You can even instruct the software to click at Fixed Screen Location and automatically bring Mouse Cursor back to it’s original Screen Location.
Mouse & Keyboard Shortcuts to Start Auto Clicking
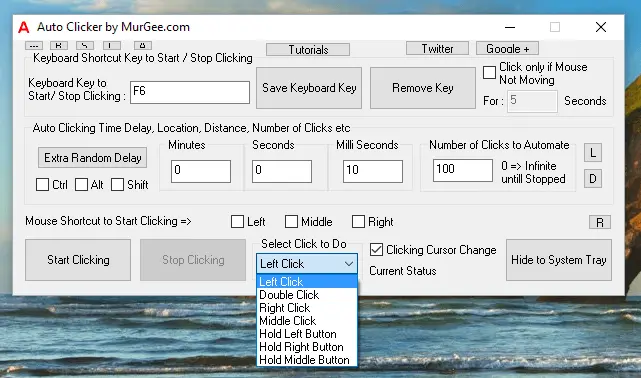
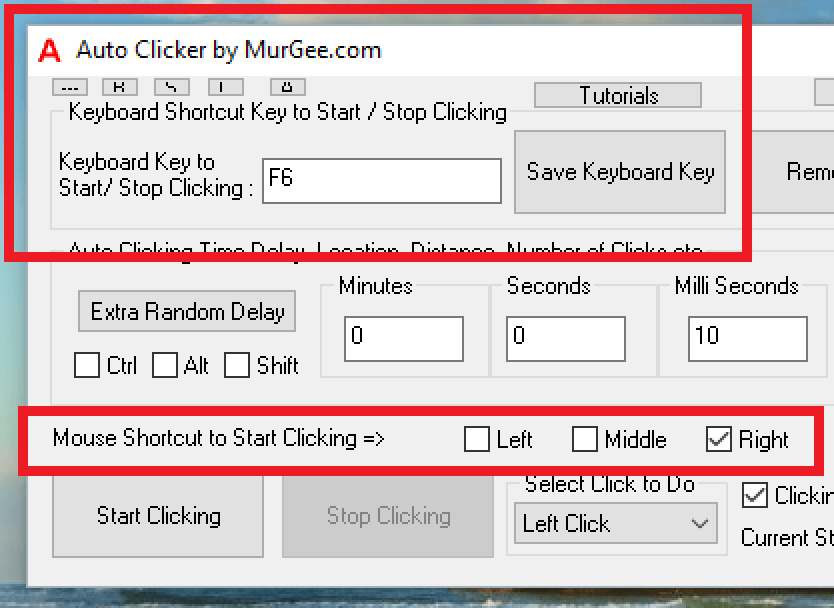
The Automatic Clicking can be Started with either a Keyboard Shortcut like F6, Ctrl + T, or a Mouse Shortcut like Right Click, Middle Click, etc. Many Games requires you to continuously use Keyboard keys like w, a , s ,d etc and hence this Auto Clicker allows you to use Mouse Click as a shortcut to start Clicking. Yes you can even assign a Keyboard Shortcut to Start Mouse Clicking as displayed in the screenshot below.
Apart for the purpose of Starting Automated Mouse Clicking, Keyboard Shortcuts also allows you to Stop Automatic Mouse Clicking. Let’s say you have configured the software to do 1000 Clicks at a time delay of 1 second and have started Mouse Clicking, but in the middle you want to Stop / Abort Mouse Clicking, you can press the Keyboard Shortcut again and the Mouse Clicking will stop. In case of Mouse Shortcuts, by default the Mouse Shortcuts are configured to Start Clicking only, however from the settings, you can enable the Mouse Shortcuts to behave like Keyboard Shortcut and use them for stopping Automatic Mouse Clicking as well.
Single or Multiple Auto Clickers
Having a single Keyboard Shortcut is a quick way to Start and Stop Clicking, however when you need Multiple Keyboard Shortcuts to Start / Stop Clicking at variable speeds or at different screen locations, you can enable Auto Clicker to launch Multiple Times. By default only one instance can be launched, so that whenever you double click on the Desktop Shortcut the existing Auto Clicker is brought forward. In order to launch multiple Auto Clickers, first you need to enable the Multiple Instance option and then onward, you can launch Multiple Auto Clickers.

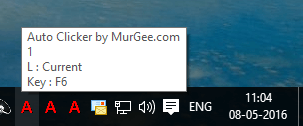
Each Auto Clicker creates an Icon in Notification area allowing you to easily identify the Auto Clicker Instance. The Tool-tip of Notification Icon displays the number of Auto Clicker and associated Keyboard Shortcut and Location of Automated Mouse Clicking as displayed in the screenshot below.
You can Right Click on any of the Notification Area Icon and to control that particular instance of Auto Clicker. The Notification Area icon of Auto Clicker displays a .ico file which you can change to make the identification of Auto Clicker Instance distinct or unique. Whenever the Automated Mouse Clicking is done by the Software a different Icon is displayed so as to identify as to which instance of Auto Clicker is actually doing the Mouse Clicking.
Note that in the above Screenshot you can either select an existing .ico file to be displayed in the Notification Area or use the default Icon of Auto Clicker. You can even Download more icons from the link provided and use them as Display and Notification Icon for the Auto Clicker.
Visual & Audible Alert for Auto Clicker
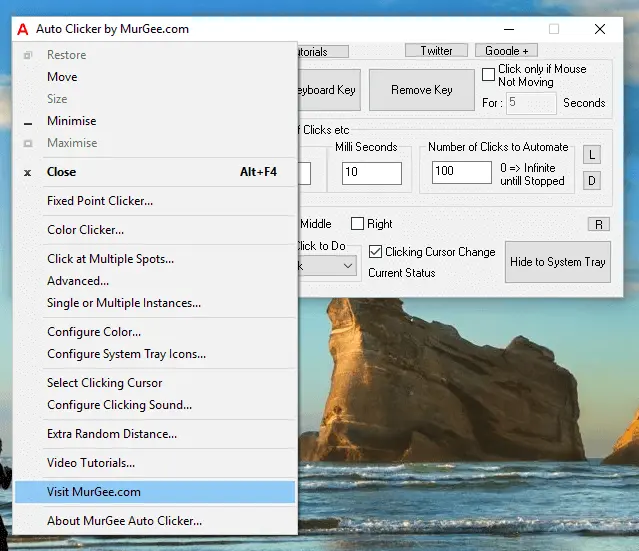
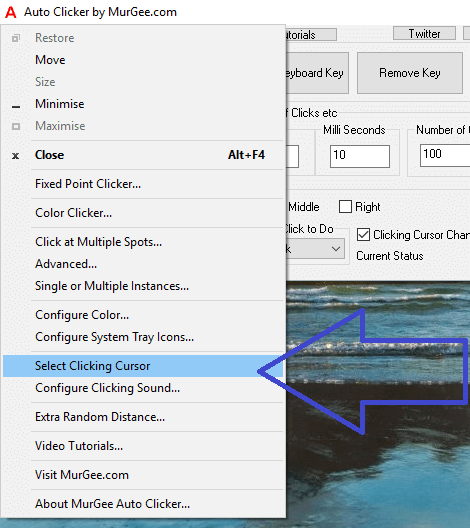
When using Auto Clicker to do Automatic Mouse Clicking, there are multiple ways in which the Software provides visual and audible clues to inform you that the Automated Mouse Clicks are being done. The Notification Area Icon change is just one of the Visual Alerts provided by Auto Clicker as described in the paragraph above. When Automated Mouse Clicking is being done, the Mouse Cursor Changes to Clicking Cursor which is basically a red colored Mouse Cursor. The Mouse Cursors are basically .cur or .ani files which bundles Mouse Cursors. You can change the Clicking Cursor of Auto Clicker from the System Menu as displayed in the Screenshot below.
The Clicking Cursor is really a distinctive Visual Indication to indicate that Automated Mouse Clicking is being done by the Auto Clicker. Apart from Visual Indications, you can even configure Audible Alerts by enabling the playback of a .wav sound file. Use a small .wav file so that you can hear sound of every Mouse Click as it is being done at configured time interval.
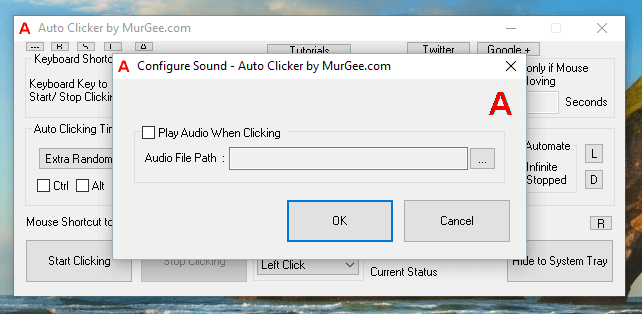
The Audible / Visual Alerts for Automatic Mouse Clicks can also be useful to distinguish between Multiple Instances of Auto Clicker. As Games have lots of sound effects, make sure to select an audio file which you can distinguish between sounds of Game and of Auto Clicker.
Auto Click at Fixed Screen Locations
When you want to Click at Multiple Fixed Screen Locations, you can either enable the Multiple Instance option in Auto Clicker or use Fixed Point Clicker. On one hand the Auto Clicker allows you to click multiple times with a single keyboard shortcut and on the other hand, the Fixed Point Clicker allows you to assign individual Keyboard Shortcut to Click 1 time at Fixed Screen Location.
Lots of Online Games like Online Golf, Cookie Clicker etc requires you to Click at pre-defined Screen Location in order to switch between Game Modes or Switch between various Tools. Keyboard Shortcuts are always handy whether you are Playing a Game, using a Text Editor or any other Application, Keyboard Shortcuts are always quick and easy to use tools. Now with Fixed Point Clicker you can create your own Keyboard Shortcuts to do Mouse Clicking at pre-defined Screen Locations easily.
Multiple Auto Clickers with Single Keyboard Shortcut
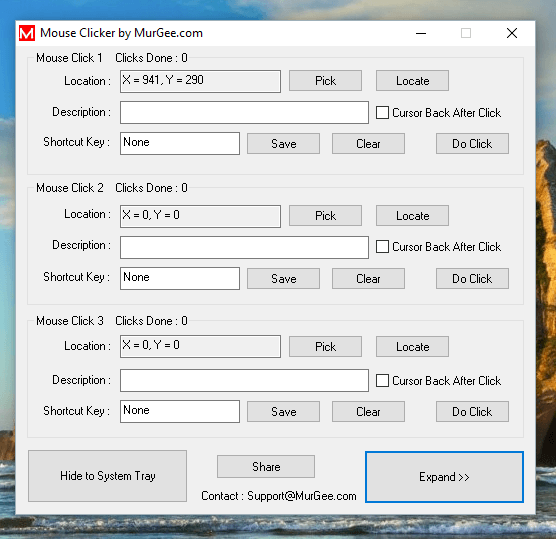
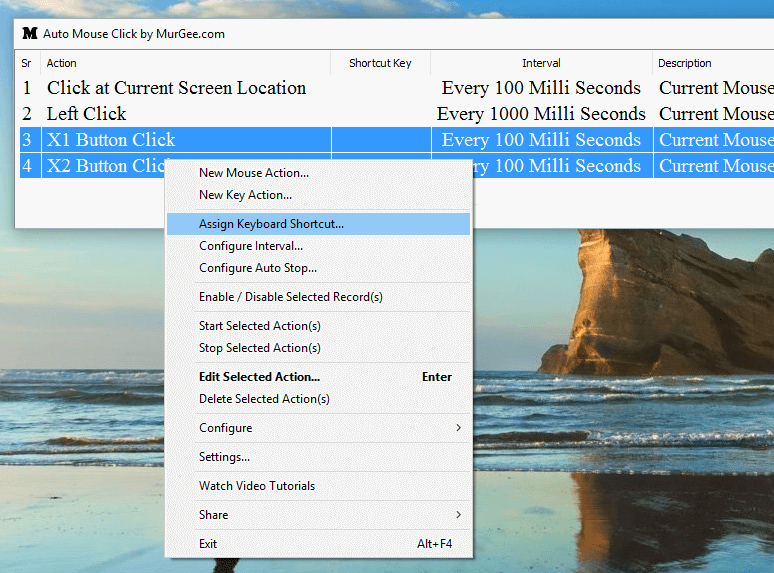
When you want to control Multiple Auto Clickers with a Single Keyboard Shortcut for clicking at Multiple Screen Locations, using Multiple Instances of Auto Clicker can be little bit difficult. Now with a inbuilt feature, you can use easily create a Keyboard Shortcut to control Multiple Auto Clickers. All you need to do is create Multiple Mouse Clickers, select them and assign a single Keyboard Shortcut to them as displayed in the screenshot below.
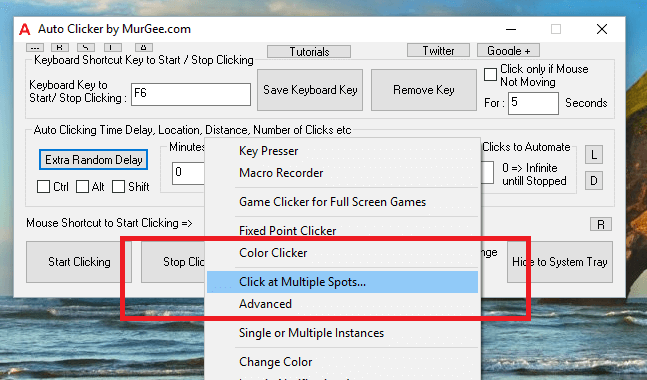
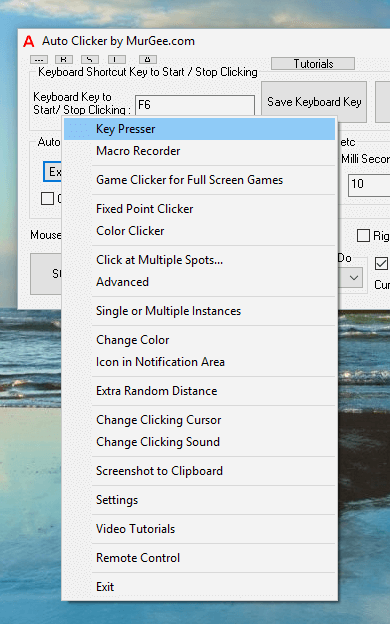
Most of the functionality is bundled in the right click menu of this Application. In order to get started Right Click on the Auto Clicker and Click on the Menu Option Click at Multiple Spots as displayed in the screenshot below. This Action launches an inbuilt Application which allows you to create Multiple Auto Clickers which are controllable with Single or Multiple Keyboard Shortcuts.
Once you have the Click at Multiple Spots Application running, right click on the Software and Click on New Mouse Action. The Mouse Action Screen allows you to define parameters of the Mouse Clicker being created and allows you to define the Screen Location at which this new Clicker should click.
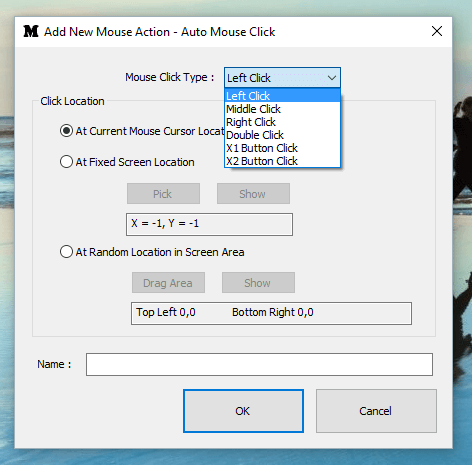
Note that you can select either Left Click, Middle Click, Right Click, Double Click or even X1 Button Click or X2 Button Click to be Automated by this Mouse Clicking Application. Once you have selected the type of Mouse Click to be simulated, you need to define the Click Location which can be any of the given below.
- Click at Current Mouse Cursor Location
- Click at Fixed Screen Location
- Click in a Random Area identified by a Rectangular Area on Screen
Once you have defined the above mentioned parameters you can assign a Name to this new Mouse Clicker. You can repeat the process above to create more Mouse Clickers. Once you have created the Mouse Clickers in the Application, select a single Mouse Clicker or Multiple Mouse Clickers and assign a Keyboard Shortcut to start those Mouse Clickers. You can Right Click on the Software to Open Settings and configure default parameters. Settings of this Mouse Clicker also allows you to configure a Keyboard Shortcut to Abort all Mouse Clicking done by the software.
Apart from Mouse Clickers, you can even create Key Pressers using the same method as described above. Lots of Games and other Applications requires Repetitive Mouse Clicking and pressing of Keystrokes. You can even create Key Pressers the same way and control Multiple Key Pressers with a single Keyboard Shortcut.
Key Presser in Auto Clicker
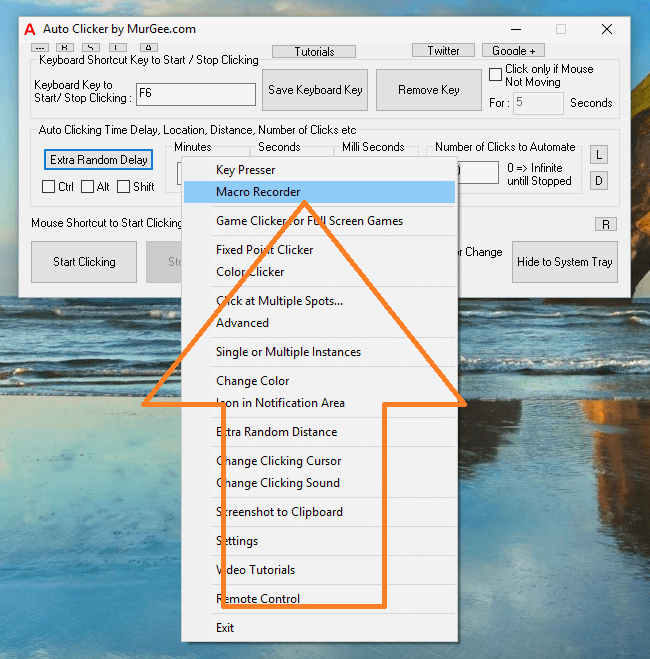
In built Key Presser in Auto Clicker allows you to press a single Keystroke Multiple Times at configurable Speed. In order to launch the Key Presser, right click on the main screen of the Auto Clicker and Click on Key Presser Menu as displayed in the screenshot below.
The Key Presser has Time Delay and other parameters to control pressing of Keystrokes with a Keyboard Shortcut. A drop down allows you to select the Keystroke to be typed onto Active Application and time delay parameters allow you to control the speed of key Presser. You can even specify Random Time Delay so that pressing of Keys is done at a Random and Controllable Speed.
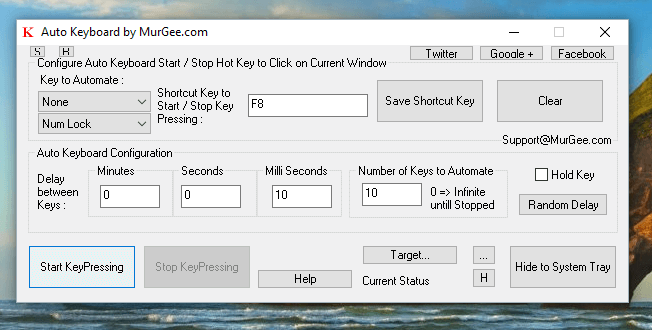
Note that this Auto Key Presser in built right into Auto Clicker and you do not need to download it separately. You can even configure the Key Presser to send keystrokes to a specific Window instead of Active Application Window. Yes you can even launch Multiple Instance of this Auto Key Presser. Note that the Automated Key Pressing done by this key Presser is as good as done manually using Keyboard and by default the Keystrokes are sent to Active Application Window.
Advanced version of Auto Clicker
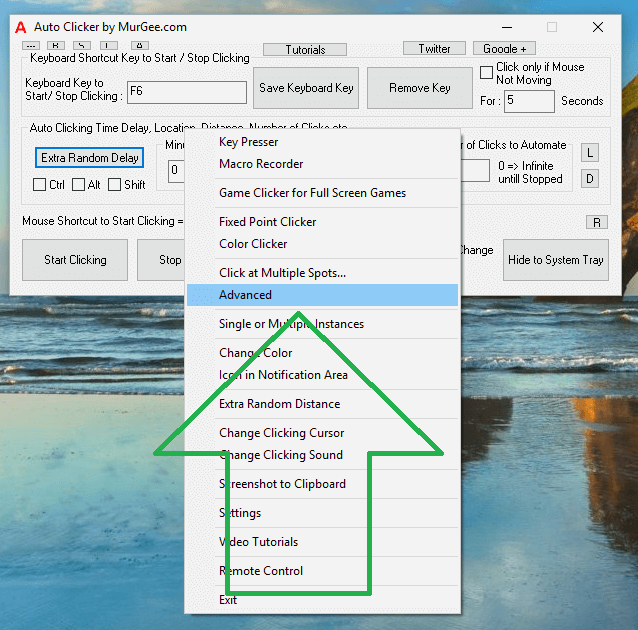
With Advanced version of Auto Clicker, you can do much more than simple Automated Mouse Clicking. In this Software you get more control over Automated Mouse Clicking as compared to provided by the main screen of Auto Clicker. The given below screenshot displays how you can launch Advanced Auto Clicker from the Right Click Menu of Auto Clicker. The Mouse Clicks and other parameters of Advanced Auto Clicker can be saved in separate Data Files (called as Profiles) and can be loaded as and when required.
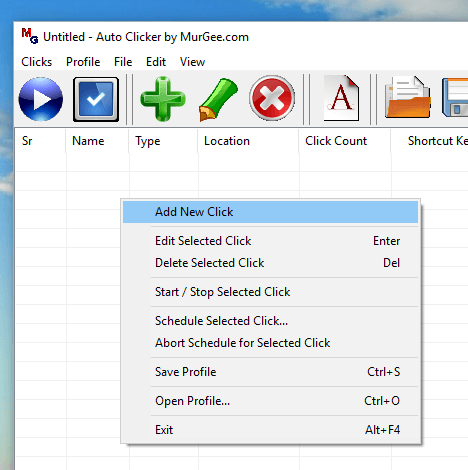
Once you have launched the Advanced Version of Auto Clicker, right Click on the Software to view the various features offered by the software. The Right Click menu provides you way to Add Mouse Click(s), Schedule / Abort Mouse Clicking, Save / Load Mouse Click Profile and much more as displayed in the screenshot below.
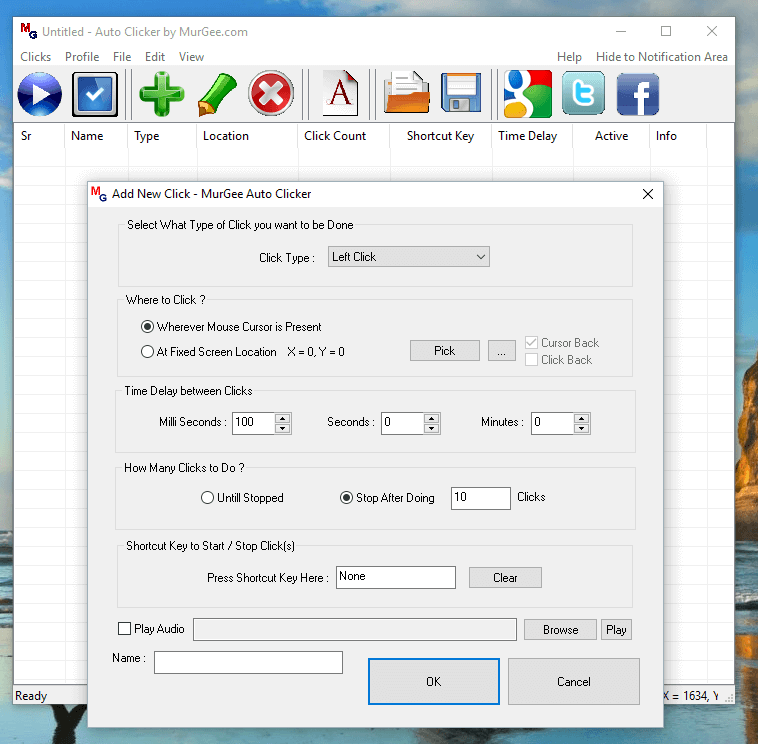
Buttons and Menu provided at the Top of the Software is a quick alternative to Right Click menu for exploring the Advanced features of this Mouse Automation Software. Adding / Editing of Mouse Clickers is easy and straight forward. Configurable Mouse Click Type, Speed of Mouse Clicking, Number of Automated Mouse Clicks, Keyboard Shortcut all together makes this Software really easy to understand and use.
Once you have added Mouse Click(s) to the Application, you can save it as a Profile so that you do not need to create them again. In order to open the saved Mouse Click Profile file, you can double click on the file and this Advanced version of Auto Clicker will load the saved Mouse Clicks automatically.
Until now we have explored Mouse Clicking and Key Pressing features of Auto Clicker. We have also explored ways to create Keyboard and Mouse Shortcuts to control the Automated Mouse Clicking. The Auto Clicker has been designed by taking into consideration feedback from Gamers and expert Software Developers have worked hard to implement Mouse Clicking capabilities so that every type of Mouse Clicking can be Automated.
Whether Automation of Mouse Clicking is required during a Online Game, Multiplayer Game or any Windows Application which require Fast / Repetitive Mouse Clicking. The Last section of this post will explore how you can use the Macro Recorder to Record and Playback Mouse Clicking and Key Pressing. This can be handy when none of features described above can Automate Combination of Mouse and Keystroke input to your Windows Computer.
Mouse & Keyboard Macro Recorder
Use Macro Recorder of Auto Clicker to record Mouse Clicks and Keystrokes and then play them back to Automate a Repetitive Task. When Recording Mouse Actions, this Macro Recorder Records all Mouse Actions including Mouse Movement, Pressing of Mouse Button, Releasing of Mouse Button and everything you do with all your Mouse Buttons. When Recording of Keystroke is enabled along with recording of Mouse Actions, you can Record keystrokes and Mouse Actions like Ctrl + Click, Shift + Click, etc.

In the above Screenshot of Macro Recorder, Recording of Mouse and keyboard is enabled. Note that you can assign Keyboard Shortcuts to Start / Stop Recording and also to Start / Stop Playback of Recorded Macro. Playback of Mouse and Keystroke Actions is done at the same speed as during Recording of Macro.
Download Auto Clicker
All the features explained above are built right into the Auto Clicker making it really the best Mouse Automation Utility. Addition of Key Presser and Macro Recorder in the software allows you to Automate Keystrokes along with Mouse Clicking. Within Windows 10 Compatibility, the Auto Clicker works well on Windows 11, Windows 10 and other older version of Microsoft Windows including Windows 8.1, Windows 2000, etc.
Download the Free trial of Auto Clicker and get access to all the features as mentioned above. Gaming with Auto Clicker is more fun and easy to control. Give your fingers a rest and let your computer’s processing power assist you in Gaming and other Repetitive Mouse Clicking with Auto Clicker.